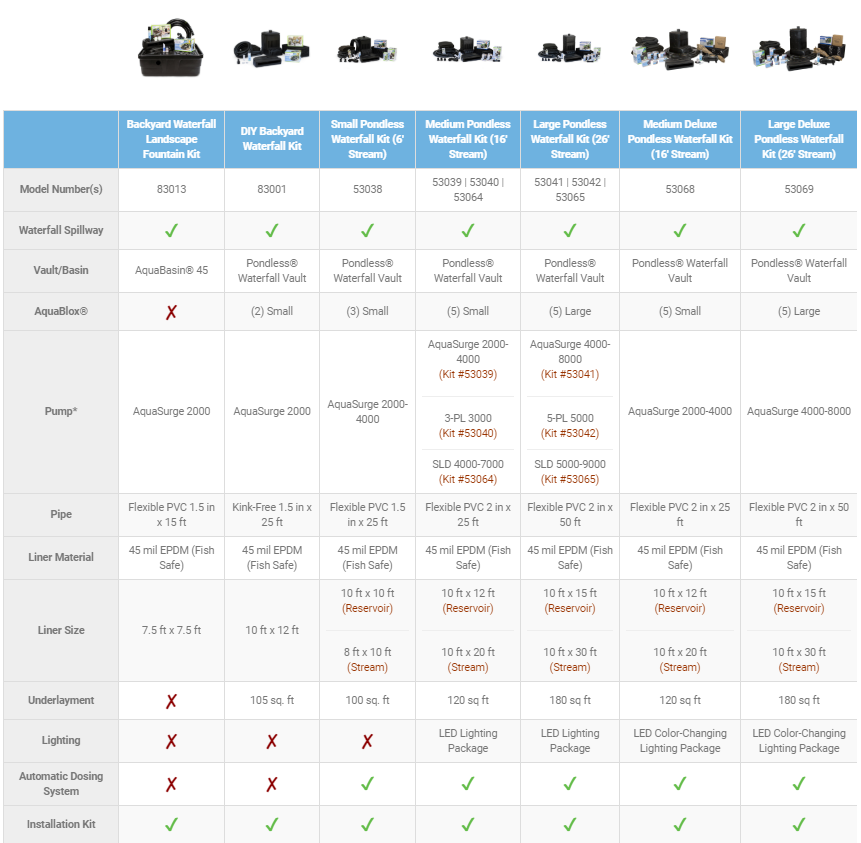
Back to ThePondOutlet.com
Creating tranquility and balance in your own backyard
Product Catalog > AquaScape > Aquascape Pond Kits  > MicroPondless Waterfall Kit


Now Only: $719.88   Qty:  
 
99769  

MicroPondless Waterfall Kit

MicroPondless Waterfall Kit

This Aquascape Waterfall kit is child-friendly, fits in the smallest of places and requires virtually no maintenance. It's no wonder it's one of our best sellers. MicroPondless Waterfall Kit includes the new and improved MicroFalls Vault, MicroCentipede Module, MicroSnorkel Vault, MicroFalls Waterfalls, AquaSurge 2000 Pump, 25 feet of 1.5 inch Kink Free Pipe, Plumbing Assembly, 10 x12 ft 45 mil EPDM Liner, 120 sq. ft. Underlayment, Installation Instructions.
--Filter mats and media nets for the MicroFalls unit are not included with the Pondless Waterfalls kits.
See our Aquascape Micro Pond Kits


• MicroCentipede Module
• MicroSnorkel Vault
• MicroFalls Filter
• AquaSurge 2000 Pump
• 1.5" of 25' Kink Free Pipe
• Plumbing Assembly
• 10' x12' 45 mil EPDM Liner
• 10' x 10' Underlayment
• Installation Instructions


Instructions:
• We suggest that you use a plain old garden hose to define the shape of your new water feature. The hose is flexible, and can be pushed and pulled in various shapes. Step back, evaluate and modify your design until you have something that you really like.
• Double check to make sure the
length and width of your layout does not exceed the amount of liner required for the pond.
• Be sure to locate the water garden close to a patio, deck, porch, or other hardscape. Also, keep in mind viewpoints of the water garden and waterfalls from inside. Try to make it visible from the
kitchen, family room, or bedroom for year-round enjoyment.
• Once the water garden is shaped and defined with the hose, take a can of brightly colored, highly visible spray paint and outline the shape (around the hose) on the grass.

br>Place filters into position
• Since the BIOFALLS® filter is typically the main waterfall, it should be positioned so it’s facing the main viewing areas
• Make sure it is placed close to the edge of the Pondless® Waterfall basin so you can use the pond liner to connect up to the BIOFALLS filter - unless you’re adding a stream.
Adding a stream will require the BIOFALLS® filter to be set further away from the Pondless® Waterfall basin and will require an extra section of stream liner
• To eliminate the need to dig a trench, lay the PVC flex pipe in place, along the edge of the Pondless® Waterfall basin, before excavation.
• The PVC flex pipe can withstand extreme weather conditions so it is unnecessary to dig a deep trench.
• To eliminate the frozen and potentially broken PVC flex pipe, the pipe should be sloping down from the waterfall to the Pondless® Vault to help drain as much water from the line as possible.

Excavate your Pondless Basin - The shape and depth
• We suggest excavating the basin no more than 24 deep. This depth provides the proper water volume in the basin to operate the waterfalls.
• All of the soil removed from the excavation can be spread and compacted around the BIOFALLS® filter, creating a berm. The filter should be completely surrounded by soil by the end of the project.
On the Level
When excavating, it is important to make sure that all of the edges are level. This is not only to avoid an unexpected low edge, but also to make sure that the skimmer sits at the proper height to skim. There are several different methods that can be used to level, depending on the resources that are available. The most accurate method is to use a transit, either sight or laser, and take several readings around the perimeter. Transits need to be rented or bought, however, and may not be the most practical option for a one-time installation. There are two other options that utilize more common household items and may be more convenient. First, you can take a standard 2’x 4” board and lay it across the pond or basin with a common bubble level resting on the center. The level will show if the two sides are even, and all sides can be measured in the same way by altering the angle of the board across the pond. The second method is to use a line level. A line level is basically a small bubble level attached to the end of a string. The other end of the string is then attached to a stake that is placed at any point around the perimeter. The level is then walked around and readings are taken at several different points to ensure the sides are even. Remember, the pond or basin does not have to be perfectly level, but general readings should be taken to avoid any major problems.
Step 5 - Install the Underlayment and Liner
• Remove any sharp objects from the excavated hole that may damage the liner.
• Unfold the underlayment fabric and place it into your excavated Pondless® Waterfall basin. Starting from the bottom, remove the slack from the underlayment, making sure it conforms into all of the elevations.
• Now place the EPDM Fish-Safe I ner on top of the underlayment.
• The installation process is the same as the underlayment, starting at the bottom and contouring the liner up and out of the Pond- less® Waterfall basin.
• Try to get the large folds out, but the main goal is to make sure that it’s lying flat and going into all corners. Don’t try to get it perfect you will hide the liner
with rocks and gravel later.
• Make sure the liner is high enough around the edges of the Pondless Waterfall basin. This should not be a problerri f you measured out the pond and excavated it correctly. Problems can be fixed by readjusting the liner into the excavation, backfilling (making the Pondless® Waterfall basin smaller) in areas where there is not enough liner, or simply buying a larger liner.

Installing the MicroSnorkelTM and MicroCentipedeTM
Simply place the MicroSnorkel’ and proper position on top of the liner. br>Add Rock and Gravel
Rocking in the Pondless
• Add the 1 1/2" to 2" size gravel into the basin up to the side of the Pondless Waterfall Vault.
• A finishing layer of decorative gravel can be added to the top if desired.
• Set larger boulders (6" — 18") around the perimeter of the basin to support the edges of the basin. The plumbing from the BIOFALLS® filter should be brought over a slightly lowered edge of the liner and to the location of the Pondless® Waterfall Vault. Boulders and gravel can be used to hide the plumbing.
Hooking up the Pump and Plumbing
The PVC flex pipe from the BlO-
Waterfall Vault. Prime and glue
fitting for at least 60 seconds. The
FALLS filter can be trimmed to
the end of the PVC flex pipe and
cord from the pump can be buried
proper length and inserted through
fitting on the end of the check valve
just beneath the stone and gravel
the slot on the side of the Pondless®
assembly. Hold the pipe into the
and run over to the electrical supply.
Wash Rocks and Gravel
• Using a garden hose, rinse the
• Place an AquascapePro clean-out
hose or an extra section of PVC
rocks and gravel from the
pump or the pump purchased
Flex pipe to pump the muddy
highest part of the pond down
with the pond kit in the lowest
water. This step helps the pond
to the bottom,
area of the pond. Use discharge
clear up faster.
Fill up the Pondless Waterfall basin with water, typically to a point just below the gravel.
Fill Basin


View PDF Info Sheet


Click on any image for a larger view


MicroPondless Waterfall Kit
Featured Items

Home | Product Catalog | Gallery | Education | Links | FAQ | Contact Us
About Us | Privacy Policy | Terms of Use | Tell a Friend | Print-Friendly Page