3 Fiberglass Lights Kit 20W MR16 & LED
Starts at: $156.44
Brand: Pond Force
SKU:PFHAL3F
The 3 Fiberglass Light Kit is a complete lighting kit equipped with everything you need to give your pond the light it needs. Nothing looks better than a well lighted pond at night! The fiberglass underwater housing is very Water Tight and great for above or under water.
3 Light Kits Include:
- (3) Fiberglass lights
- (3) Landscape Stakes
- 25� Low voltage cable
- Removable base
- 88W transformer w/photo eye
- (3) 15' cords
Available:
|
Part Number |
Bulb |
Watts |
|---|---|---|
|
PFHAL3F |
MR16 Halogen |
60 |
|
PFLED3F |
White LED |
5.4 |
Each light should have come with a 15� cord connected to each light.
Also included should have been a 25� Length of Wire to go between the transformer and the 3 light cords.
- Separate the 2 strands on one end of the 25� length of wire, strip about 5/8� of each wire and wrap each around the Screw terminals on the transformer.
- Do the same to the other end of the 25� wire and also strip and separate the other 3 wires.
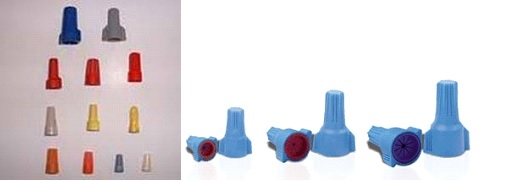
- Use a Wire connector (I like the ones filled with silicone � see examples below) and splice the wires together as described below. Make sure your splices are done on land and not left underwater. (They are fine laying in the dirt)
Splicing Wires for Low Voltage Lighting
The great thing about Low Voltage lighting is that it is impossible to electrocute yourself.
If you do not want to use the custom "Quick-connect" plugs that come with many of the low voltage lighting systems it's easy to splice the lights in with any existing low voltage system.
Remember when adding lights to an existing transformer, the sum of the lights should not exceed 90% of the rated capacity of the transformer. In other words, a 100 watt transformer can take four 20 watt and one 10 watt light.
1. Just clip off the plug
2. Separate the two wires by pulling apart about 3 - 6".
3. Strip about 5/8" off of the new wires and the wires that you are splicing into
4. Take one of the existing wires and the new wire and using a Wire Connector (I like the weatherproof ones designed for Underground connections), hold the two wires together parallel and twist the Wire Connector around them tightly.
5. Repeat for the 2nd wire
6. Wrap Electricians tape tightly to wrap around each connection for extra protection
Note: When stringing together multiple lights, rather than stringing the lights in a straight line from the Transformer out to the furthest light - String the lights in a continuous loop with a wire going from the Transformer to the first light and then bring a wire from the last light and connect with a transformer too. This evens the distribution of power to all lights. If this is not done, the last light in the string will not get as much juice as the first one. Another way is to string the lights in a "Tee Formation"