Winterizing the Pond
 February 21st, 2010
 PondMeister
Just received this common question regarding winterizing the pond:
Question:
“I do have a problem and I am hoping you can help. I live in Columbus, Ohio and my pond is approximately 10’x10′ and 2′ in depth with a waterfall/stream. I am having difficulties keeping the pond from freezing over and/or keeping a whole in the ice. I have tried multiple solutions like:
1) Running the pump/waterfall through out the winter hoping the moving water would prevent the freeze. This works for a period of time but eventually the pond freezes over.
2) I have placed a “Thermo Pond 3.0 De-Icer ” (100 watts and 3-4 years old) and it does not keep a whole in the ice. I am not sure if it is broken or not robust enough to keep a whole open based on the size of my pond
3) Placing a 50 gph pump in the pond in an attempt to keep the water moving. This works for a period of time but eventually an ice dome forms over the pump thus enclosing the pond.
Do you have any recommendations for a different approach or a better de-icer?”
Answer:
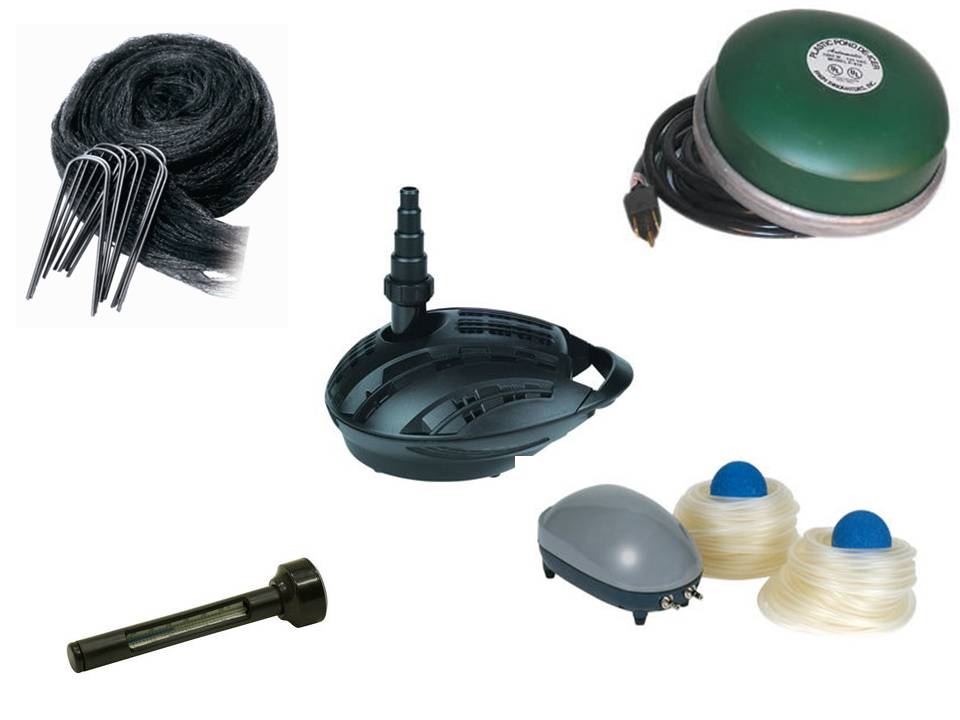
You are on the right track but some of your equipment is a little under-powered. See our Winterizing Kit.
1. You have an approximate 1400 gallon pond. You should probably go with at least a 1250 or Aquascape 1500 watt de-icer for your zone and size of pond (see attached chart). The 100 watt de-icer you have is too small.

2. Your pump is way too wimpy too. We usually recommend the AquaForce 1000 to be placed at an angle tilted sideways breaking the surface of the water to help keep a hole in the ice. A 50 gph pump is way too small to be effective in a climate like yours.
3. As a final measure to make sure the hole stays in the ice, we recommend an Aquascape 4-stone aerator which also provides oxygen for the fish.
And please remember if you hammer at the ice with an ax or shovel, you risk killing the fish with the shockwaves!
General Winterizing Tips
Preparing Your Garden Pond for Winter
Although the real cold weather is a few weeks away, pond owners need to turn their thoughts to winterizing their ponds. Fall is the time of the year when your soon-to-be dormant fish build up fat reserves for their semi-hibernation over the winter. Ponds that contain fish have to be readied for the winter, at the latest when the water temperatures falls below 50 degrees farenheight. In order to prepare for the cold weather ahead, the metabolism of your fish slows down. At this point, the fish are no longer able to digest high protein fish foods. Pond owners should switch to a low protein/ high fiber food (such as a wheat germ based fall fish food) as fall approaches in order to avoid undigested food remaining in their system once the real first cold snap occurs.
Here are some other tips and steps you can take for winterizing your pond:
Plants: Cut back all aquatic plants by 3/4’s leaving tender new shoots intact. Inspect plant containers for root bound plants and plan on which plants need to be repotted in the spring. Move all hardy water lilies and lotus to the deeper section of the pond. Some marginal aquatic plants, like cattails, iris and pickerel rush can be left on your plant shelf. Move tropical plants indoors. Store tropical water lilies inside. Remove all water hyacinths and lettuce and discard.
Pumps: Remove the pump from the pond to avoid damaging the rubber or plastic seals in the pump. Many manufacturers recommend storing pumps in a bucket of water in a frost free area. Biological filters can remain outside, but ultraviolet lights should be cleaned and taken inside for the winter. Aim the pump at an angle so the flow breaks the surface.
Aeration: We have seen fish kills in ponds that have had only a de-icer that was able to keep a hole in the ice. In these cases the gases were still concentrated enough despite the hole in the ice to affect the fish. Using an aerator helps keeps the surface of the water unfrozen as well as provides valuable aeration for your fish.
Pond Netting: Cover your pond with a net to keep the leaves out of your pond. Leaf buildup can crate unsafe conditions for your plants and fish.
Keep a Hole in the ice: To safely keep fish in your pond throughout the winter you must keep a hole in the ice. This can be done with a pond de-icer, air bubbler or solids handling winter pump. A build up of gas under the ice can be very toxic to your fish. This gas needs to have a way to escape. Never break the ice that forms on your pond as this can be detrimental to the health of your pond fish.
Thermometer: Get a thermometer! When the POND temperature drops under 55 – 60 degrees, discontinue your normal Bacteria and enzymes and switch to Cold Water Beneficial Bacteria which will be effective to 45 degrees. At 55 degrees, discontinue feeding your fish regular fish food. They may continue to eat but they will be unable to fully digest the food which may be harmful. Switch to a Cold Water Winter/Spring Food (usually containing easily digestible Wheat Germ)
Following these steps will prepare your pond, aquatic plants and fish for the winter months ahead and make for a stress free pond opening when the weather turns warm in the spring.
Winterizing Urns: We recommend that you drain the urn, pump out the basin, and bring the pump inside. With the urn, you can either turn it upside down and put a tarp over it or bring it inside a garage or shed. Aquascape also suggests using a grill cover over the urn.
 Pond Products, Pond Tips | 0 Comments
Troubleshooting Leaks from Aquascape
February 16th, 2010
PondMeister
 We received a question from one of our Facebook fans tonight on finding a leak in a pond. We would like to share with you a document from Aquascape produced for Contractors to help them locate a leak in a pond. Keep in mind that this is geared towards Aquascape ponds with Skimmers and BioFalls but the basic principles are fairly universal.
Troubleshooting Leaks by Aquascape
Step 1: Does The Pond Actually Have A Leak?
Often, the new pond owner doesn’t realize how much water can evaporate from a pond during the dog days of summer.
- The midwestern states typically lose 1” to1 1/2” inches of water each week.
- Contractors down in the hot, arid southwest, such as Arizona, have reported evaporation levels in excess of 3” a week.
Remember, these are averages. Some ponds may not experience evaporation levels this high, while other ponds with large pumps pushing high volumes of water, and/or ponds designed with multiple waterfalls with a lot of cascades and splashing, may have evaporation rates much greater than these.
Step 2: Look For Low Edges
After you’ve talked to the pond owner and determined there is a leak, the next step is to visit the pond.
- Here’s a little secret. 99% of all leaks are not due to a hole in the liner, but rather water making its way over the edges of the pond, stream, or waterfalls.
- Look for any low edges. Settling at the pond’s edge is the most common cause of a leak, especially in a new pond.
- Typically, the low edges are found around the stream and waterfall where settling may have occurred after a few rainfalls. These areas are usually built up during the construction of the pond using the soil from the excavation, and are prone to some settling.
- Look for signs of a low edge.
- Wet mulch along the edge of the pond or stream.
- Wet gravel along the edge of the pond or stream.
- You may need to move back the gravel in certain areas to find the low edge.
How To Fix A Low Edge
Low edges can be built back up by simply back filling and compacting soil beneath the liner in order to raise the edge of the liner above the water level.
Step 3: Look For Obstructions In The Stream And Waterfalls
- Check to make sure nothing is causing the leak by restricting the flow of water down the waterfalls or stream. The pond owner may have adjusted some of the rocks in the waterfalls in order to improve the look of the falls, inadvertently causing some of the water to be diverted over the liner. We’ve actually had customer’s kids relocate rocks in the streams in order to create a battlefield for their army men.
- Water can also make its way over the edge due to excessive plant or algae growth in the stream or BIOFALLS®. The water simply gets backed up from all of the plant growth. Plants and algae should be maintained by trimming them back in order to let the water pass freely.
- All in all, these leaks are extremely easy to fix. You can save yourself some time down the road by spending a few extra minutes with new pond owners at the time of installation teaching them how to identify and fix minor leaks such as these.
Step 4: Shut Down The Pump
You’ve spent 15 minutes or so following the suggestions listed above and you still can’t find the leak. What do you do next? Well, we now have to go one step further and try to narrow things down a little more.
- Turn off the pump and leave the pond for a period of 12 or more hours.
- Revisit the site after 12 hours, or ask the homeowner to call the next day and let you know if the water level has dropped.
What Does This Determine?
- If the customer calls and says the water level has dropped then we know the leak is in the pond.
- If the water level remains the same in the pond then it is assumed that the leak is in the stream.
*This procedure helps us save time by narrowing down the source of the leak.
If The Leak Is In The Pond
The pond owner calls and states that the pond’s water level dropped while the pump was turned off. We now know that the leak is in the pond.
- When our crew goes out to fix the leak, they concentrate their efforts on looking for the leak in the pond and completely ignore the waterfalls/stream.
- Before rushing out to visit the site, wait until the water level stops dropping. This may take a few hours or a couple days, but will help determine the height of the leak. Have the homeowner call back when they notice the water level is no longer dropping.
- Visit the site and concentrate your search around the perimeter of the pond at the level that the water has stopped dropping.
- If the water level stopped below the bottom of the skimmer face plate you can rule out the skimmer and concentrate elsewhere.
- If the water level is above the bottom of the face plate you should investigate the skimmer. It may not have sealed correctly, but don’t tear apart the skimmer face plate.
If The Leak Is In The Skimmer
- Investigate the skimmer face plate without disassembling it.
- Simply move a few rocks around the front of the skimmer and slide your hand behind the liner. Feel for wet soil around the opening of the skimmer.
- If it’s bone dry, it’s most likely not the skimmer.
- If the soil is saturated, then the face plate may have not been installed properly and might be the source of the leak.
- Remove the face plate, clean all of the old silicone off the liner, and refer back to the instruction manual on proper procedures for sealing the skimmer face plate to the skimmer. Hopefully, you’ve solved the leak
If It’s Not The Skimmer
- Investigate the liner for small punctures around the perimeter of the pond where the water level has stopped.
- Unfortunately, the only effective way to find this type of leak is to start moving rocks and gravel and search for the leak by hand and eye.
- The leak, once found, can be easily fixed using Aquascape’s EPDM patch tape.
Example of a shutdown procedure where the leak is in the waterfalls/stream
- The pond owner calls and states the ponds water level has not dropped over the past 12 hours.
- This immediately tells us that the pond is not the source of the leak. So, in other words, do not waste your time looking in the pond or the skimmer for the leak…it’s not down there. The leak is somewhere upstream!
- Turn the pump back on and get the waterfall flowing again.
- First, double check that all of the edges are high, and any stream liner overlaps or liner seams are done correctly.
- Secondly, check to make sure the seal on the lip of the BIOFALLS® was installed correctly and is watertight.
- Don’t tear apart the BIOFALLS® lip! You can investigate the BIOFALLS® lip without completely disassembling the waterfalls.
- Move a few rocks around the side of the BIOFALLS® and/or remove some soil from the side of the BIOFALLS®, allowing you to slide your hand behind the liner.
- Feel for wet soil around the BIOFALLS®.
- If it’s bone dry, it’s most likely not the seal on the BIOFALLS®.
- If the soils saturated, or you feel water leaking, then the lip needs to be resealed.
- Important Note: A few things could have caused the leak at the point of the BIOFALL® seal. Either the seal was done incorrectly, or the liner was stretched or pulled too tight while setting rocks for the waterfalls. Make sure to give yourself liner slack along the front of the BIOFALLS® to prevent stress on the BIOFALLS® seal.
- Reseal the BIOFALLS® by removing the BIOFALL® Lip. Clean all of the old silicone and waterfall foam off the liner, and refer back to the instruction manual on properly sealing the BIOFALLS® lip.
- If you have still been unable to find the source of the leak begin to investigate the rest of the stream and the waterfalls.
- At this point it is most likely a hole that you should be searching for.
- If the waterfall is right off the side of the pond, or only 5’ back from the pond, the most efficient method is to remove the rocks and gravel in the waterfall area and search for the leak by hand and eye. The leak, once found, can be easily fixed using Aquascape’s EPDM patch tape.
Narrowing Down The Leak On Long Streams
- Leaks can also be narrowed down on waterfalls and streams by performing the “pipe test.”
- The pipe test will take a few days to determine the location of the leak, but it will be well worth the effort.
- The pipe test consists of a section of pipe laid on the ground. The pipe is connected to the pump in the skimmer. The pump is turned on and the end of the pipe is then set at the lowest point in the waterfalls/stream.
- We then either travel back to the pond the next day or have the homeowner call us to let us know if the water level in the pond has dropped.
- If it hasn’t dropped we move the pipe 10 feet further up the stream. We do this process until we notice the water drop in the pond. We know that once the water drops, the leak can be found within 10 feet of the pipe. We can then move the rocks and gravel to search for the leak by hand and eye.
Tips From Team Aquascape:
Tip 1:You can sometimes determine if the seals on the skimmer and BIOFALLS® are water tight by temporarily moving a few rocks around the front of the filter allowing you room to feel for wet soil behind the liner.
Tip 2: You may want to save yourself some time down the road by spending a few extra minutes with the pond owners teaching them how to identify and fix minor leaks such as low edges and excessive plant growth.
Tip 3: It’s difficult to find a leak if the ground is wet from recent rainfall. Wait to look until dry weather.
Pond Tips, Questions and Answers | 1 Comment
Try an In Pond Skimmer!
February 13th, 2010
PondMeister
Do you have a pre-formed pond or cement pond and having a problem with leaves and debris sinking to the bottom of the pond? Or do you have a dead area in your pond where water is not circulating but cannot fit a skimmer into because of your landscaping.? The new OASE In-Pond AquaSkim or it’s smaller cousin the OASE SwimSkim may be the answer!
I had a dead area in my 6,000 gallon pond where the pull of the skimmer at one end of the dogleg was not able to pull debris coming from the end of the opposite dogleg. Leaves and other debris would sink long before they reached my single skimmer. The debris would sink to the bottom and provide great food for the algae besides looking unsightly and clouding the water.
I placed one AquaSkim about a foot from the shore at the end opposite of my Aquascape Grande Skimmer so I could reach it easily to empty the Debris Net. The AquaSkim takes a 1600 gph to a 4,200 gph pump. I selected the 3,200 gph PondMaster Pro HyDrive Submersible pump , removed the casing and attached it with a very short 2″ Flex pvc pipe to the AquaSkim. I connected another 2″ flex pvc hose to the discharge of the pump and sent it up to one of the holding troughs for my waterfalls.
See full size video on YouTube
I put another AquaSkim closer to the center of the pond but still about a foot from the ledge and sending it up to a trough as well. I could also send the discharge through a Pressure Filter which I am considering now.
I am lucky enough to have our pond situated under 3 huge California Pepper Trees (think Weeping Willow) that are unique in that they are one of the few trees to shed 365 days a year! Since installing these two AquaSkims, the amount of debris reaching the bottom has been minimalized. The only downside is that I have to empty them and shake them out once a day but I view that as a positive!
I also tried the OASE SwimSkim as well but it was a bit too small to have any impact on my large pond. It comes with a self-contained 535 gph pump and a small Filter pad and Debris Basket. It would provide a nice skimmer for a pond under 800 gallons Check out the SwimSkim video SwimSkim Video as it could be a nice additional skimmer filter for a small water feature.

Pond News | 0 Comments
Aquascape's IonGen - Say goodbye to Algae forever!
February 6th, 2010
PondMeister
Aquascape introduced the new IonGen Electronic Clarifier on September 1st of last year. I was so excited that I had mine installed in my 6,000 gallon pond by Sep 6th. It took me about 15 minutes to install it. I love it!
The IonGen drastically reduces pond maintenance and provides crystal clear water without the use of chemicals and completely eliminates the need for Algaecides. A microprocessor inside the IonGen control panel causes the outermost atoms of copper, silver, and zinc to lose an electron, creating a positive ion. The positive ion attempts to flow from one of the Probe’s bars to the other and is swept away by the flow of water where the ion can begin to treat the water. The IonGen Probe is self cleaning, using reverse polarity to prevent scale and debris build-up on the Probe’s bars. One IonGen unit is sufficient for up to a 25,000 gallon pond.
Aquascape has been testing it for three years and gave it to a number of their employes to test last summer. Everyone that I talked to was blown away. They say that you no longer need to use algaecides to control the algae but you will still have to use the Beneficial Bacteria – Dry (or the Liquid or Cold-Weather Bacteria). The probes should last about 1 year. A red light on the control panel comes on when the probe is used up.
They emphasize that this is very different from a UV light that “fries” all the bacteria – good and bad. The IonGen only takes about 1 watt to drive the electronic control panel unlike a UV which can require as many as 80 watts.
Scott Rhodes, Director of Product Marketing for Aquascape, Inc, assured me that their is no impact whatsoever to the fish. They have done a number of dissections on fish that have been exposed to the IonGen and show no traces of copper, zinc or silver.
Please take 10% off the already discounted price on our site by using the Coupon Code – blog10 – in the Coupon Code box at Check-out.

Iongen Algae Control


Pond News, Pond Products | 1 Comment
Pond Vacuums - Are they worth it?
February 3rd, 2010
PondMeister
I just got my first question of the season concerning pond vacuums for cleaning out fountains and ponds. Some of them can be very helpful in cleaning the muck from the bottom of the pond after a long winter. Personally I like a complete clean-out in the spring but vacuums definitely have their place.
There are definitely some pieces of junk out there that cause more frustration than benefit. We have had to remove three products off of our site due to the ridiculously high return rate. Virtually every one of the motor-driven Matala Muckbusters were returned. These retailed around $250. The manufacturer’s response was always “It’s the customer’s fault” and refused to take them back sticking us – the retailer – with the product. (Anyone need a really cheap Muckbuster? We still have a returned one in the warehouse.)
The AquaQuik Pool & Spa Vac and the Ulti-Vac from Python were very inexpensive but as many were returned as we sold so we finally quit stocking them as well. These two products were driven by water pressure from the hose or hand-pumping to create suction.
The Muck Vac has been around for a million years and is great for fountains, very small ponds or spot clean-up. It costs $87.33 for the unit and I would strongly recommend the 10′ extension hose for the discharge. This works off of water pressure (50 psi minimum) so the greater the pressure, the greater the sucking action. It is a bit clumsy to use and you cannot see how much muck you are getting out unless you view the discharge tube but it will clean a small pond or fountain..

Muck Vac in a fountain
The top-of-the-line is the Pondovac 3 by OASE and sells for $379. This has a powerful electric motor that sucks the muck from the pond, fills up one chamber, spews out the muck through an extension tube and then fills up the second chamber. This one really works and is great because there is a clear handle where you can actually see how much muck you are getting so you can move on to the next area when the water becomes clear as it comes through the handle. This is pretty strong so you have to be careful if you have very small pebbles in the bottom of the pond. The suction hose is 16′ and the discharge hose is 8′ so you have plenty of room to maneuver the machine which has wheels like a canister vacuum cleaner. It comes with a fine mesh filter bag so you can trap the dirt as it is discharged. I would recommend this for a small to mid-sized pond and any fountains.

- Pondovac 3 in action
One quick note. Please DO NOTdo as the PondMeister did. We have a sparkling pool and spa next to our pond. I spent 2 hours intensely vacuuming our 6,000 gallon pond sending a bunch of muck into our drainage system in the backyard which carries out to the street (probably not a great idea). I was amazed at how much muck was being sucked through the Pondovac’s handle. Nearing completion, I stepped back to admire my handiwork and the pond looked awesome. And then I looked at the “sparkling pool”. Whoops – our drainage system had backed up with all the muck and was all routed into – you guessed it – the pool! Ugh – what a mess! I had the prettiest pond and the most disgusting pool ever. Had to drain the whole pool and start over. The moral of the story is – make sure you know where you are directing all the muck too – it makes great fertilizer…but not in a pool!
Pond Products, Pond Tips | 2 Comments
Snails and Algae in the Pond
January 31st, 2010
PondMeister
Just got this question from a customer:
“I live in Green Bay so right now my 1200 gallon pond is mostly iced over except where the heater and fountain is. I have an extreme amount of string algae growing this winter. We have 11 Koi ranging in size from 10″ to 16″ and 2 comets about 10″ long. We also have about 8-10 baby comets and 2 dozen baby Koi,all 2″-4” long. We plan on getting rid of all the babies this spring. We had heard that Japanese trapdoor snails could help control algae, and have tried introducing about 200 of them last summer. The snails didn’t control all the algae last summer, but some. The problem I now have is I need to find an algae control product that is also safe for my snails. Many products that I read about are not safe for crustaceans, which I assume to be snails also. Do you have any products that would work for me? Also, any tips for controlling algae in winter? Thank you.
I have never heard that about snails but as for me, snails leave as much waste behind as they devour. I know you ask 10 different pond people the same question, you will probably get 15 different answers but I would use AlgaeFix with a Beneficial bacteria product like Cold Water Beneficial Bacteria (Water temp between 45 and 60 degrees) or Beneficial Bacteria – Dry by Aquascape (when the water warms under 60 degrees) to combat the string algae rather than snails. AlgaeFix and EcoBlast by Aquascape are NOT temperature sensitive so they can be used in cold water.”
ThePondOutlet Response:
I have never heard that about snails but as for me, snails leave as much waste behind as they devour. I know you ask 10 different pond people the same question, you will probably get 15 different answers but I would use AlgaeFix with a Beneficial bacteria product like Cold Water Beneficial Bacteria (Water temp between 45 and 60 degrees) or Beneficial Bacteria – Dry by Aquascape (when the water warms under 60 degrees) to combat the string algae rather than snails. AlgaeFix and EcoBlast by Aquascape are NOT temperature sensitive so they can be used in cold water
Also, Snails are NOT Crustaceans. See below:
Snails
Clams, snails, and crustaceans are invertebrates. Clams and snails are in the phylum Mollusca. Mollusks have soft bodies usually enclosed in a thin hard shell made of calcium. The U.S. Fish and Wildlife Service uses the generic term “clam” to refer to clams and mussels, but there are physical and reproductive differences between the two creatures. In general, mussels are larger than clams and have an oblong lopsided shell, as opposed to the round symmetrical shell of the clam.
Crustaceans are a large class of creatures with a hard exoskeleton, appendages, and antennae. This class includes lobsters, shrimps, and crabs
Snails belong to the class Gastropoda of mollusks. Snails typically have an external spiral-shaped shell and a distinct head that includes sensory organs. Snails inhabit terrestrial (land), marine, and freshwater.
I pulled the info below off of PondCare’s website.
Hope this helps,
Richard
| Product FAQs | |||||||||||||||||||||||
|
Technical Reference Sheet for PondCare® AlgaeFix® |
Purpose And Benefits:Effectively controls many types of green or green water algae, string or hair algae and blanketweed in ponds that contain live plants. Controls existing algae and helps resolve additional algae blooms. Keeps ornamental ponds and water gardens clean & clear. E.P.A. Registration #8709-8. Can be used in ponds with plants! Directions For Use:Add 1 teaspoonful for every 50 gallons of pond/fountain water or 1/2 cup for every 1,200 gallons. Thoroughly mix into pond/fountain by adding near the pump outflow, waterfall, or aeration device. Can be mixed in a bucket of pond/fountain water and dispersed evenly around the pond/fountain. Repeat application every 3 days until algae is controlled. Be prepared to siphon out dead filamentous algae. Once algal growth is under control, add one application per week. Weekly treatments will control algal growth and reduce pond/fountain maintenance. Compatibility:Before using AlgaeFix, make certain that the pond has vigorous aeration, (a fountain, waterfall or aeration device) especially during hot summer months. In summer heat, pond water contains very little oxygen. In sunlight, algae and submerged plants produce oxygen, and in some cases may be the major source of oxygen in the pond. At night, however, submerged plants and algae actually consume oxygen. Decomposing organic matter also consumes oxygen, even after it is removed by the filter. Until the filter is changed, decomposing organic matter may still cause the oxygen level to drop to harmful levels if adequate aeration is not provided. Therefore, when using AlgaeFix, especially during the warm summer months, adequate aeration is required to keep oxygen levels healthy for your fish. Do not shut off pond pumps or aeration devices at night! Aeration must be provided to pond life at all times. Caution: Do not use AlgaeFix with crustaceans, including: crabs, shrimp, freshwater shrimp, and freshwater lobsters. Sizes Available:#169A – 8 oz (237 ml) bottle treats 2,400 U.S. gallons (9,072 L) #169B – 16 oz (473 ml) bottle treats 4,800 U.S. gallons (81,144 L) #169G – 32 oz (946 ml) bottle treats 9,800 U.S. gallons (36,340 L) #169D – 64 oz (1.89 L) bottle treats 19,200 U.S. gallons (72,576 L) #169C – 1 gallon (3.78 L) bottle treats 38,400 US gallons (145,344 L) #169J – 2.5 gallon (9.45 L) bottle treats 96,000 US gallons (363,400 L) |

AlgaeFix
Pond News, Questions and Answers | 0 Comments
Pond Tips for Saving Energy Part II: Energy Efficient Pumps
January 29th, 2010
PondMeister
Have you checked the electricity that your pump is using lately? I was at a big box hardware store a couple of weeks ago and saw a 3000 gph waterfall pump that did not even have the watts that it used ANYWHERE on the box. When I got home, a quick search revealed that 3000gph pump took 700 watts or $50 a month to run.. Ouchhh! The Aquasurge 3000 gph pump takes 180 watts – only $13 per month to run.
As I mentioned in an earlier Blog, Los Angeles power rates are unbelievably high. My partner Les has a 5,000 gallon pond with 2 Aquascape Classic Skimmers and 2 Aquascape BioFalls that are each about 2.5′ high. Les has a very cool pond next to an awesome spa which nestles below an overhead grotto fed by yet another stream coming from 30 feet up his hillside. This summer his power bill climbed to over $800 a month. Ouch!
In the first skimmer in the small pond, Les had a 2500 gph pump. At 5′ of Head height he was getting about 2300 gph and using 250 watts with his current pump. By switching to Aquascape’s energy-efficient Aquasurge 3000, Les got out 2853 gph while using only 180 watts. No brainer – Aquasurge 3000 for sure!
In the Skimmer in the larger portion of his pond, Les had an Aquascape Pro 7500 which is a “High Head” pump designed to push water has high as 42′. Les was getting 6700 gph at 5′ while using 1200 watts running 24/7.
Les decided to go with two energy-efficient pumps to replace his one big 1200 watt energy hog. Aquasurge 5000 will get out 4280 gph at 5′ using 250 watts and the Aquasurge 3000 will get out 2853 gph while using only 180 watts.
By using an Aquasurge 5000 and 3000, Les is now able to get out 7,133 gph while only using 430 watts compared to 6,700 gph and 1200 watts for his old energy hog. Now Les is getting out more water and uses 770 watts less for the largest portion of his pond.
At 10 cents a kilowatt hour these 2 changes will save about 840 watts or about $60/month. Imagine the cost of leaving 8 or 9 100 watt light bulbs on 24/7. In the tiered pricing system we have here in Los Angeles, Les was actually paying 30 cents per kilowatt hour as he was in the 5th tier. These changes ultimately have saved about $200 per month on Les’ power bill each month. Talk about a payback!
Technical Note: In order to merge the 2 pumps that replaced Les’ one energy hog pump, he used a 2″ Y Slip Fitting to connect the 2 pumps to the existing 2″ Flexible PVC pipe going from the pumps to the waterfall.


Pond Products | Comments Off on Pond Tips for Saving Energy Part II: Energy Efficient Pumps
Pond Tips for Saving Energy: Lighting
January 23rd, 2010
PondMeister
Here in sunny Southern California, we have a tiered pricing system for electricity. If you have anything more than an alarm clock and 1 light bulb, you are kicked into the next tier. Unlike Frequent Flyer miles, it is NOT good to reach the next level. The rates begin at 7 cents/kilowatt hour and are 30 cents per kilowatt hour by the 5th tier.
Seven years ago when we built the pond, pool, fountain and added all the outdoor lighting, we never even gave the power consumption and resulting electricity costs a thought. When our electric bill hit $850 per month, all of a sudden I realized that not only was I costing myself a fortune, but also using up valuable resources in our society.
Since then I have researched and replaced the lighting for the pond and yard, without sacrificing safety, beauty, or reliability. Read on…
LED’s and Halogen Lights
Most of us in the pond and yard have traditionally used 20 watt halogen lights under the water directed away from the viewer to highlight the fish and 10 watt halogen lights under the waterfalls to highlight the falls. Many of us also use 50 watt halogen lights to highlight our houses and the trees and bushes in the landscape.
Most of the manufacturers have come out with some form of LED lights in the past year or two. Savio, Alpine, Atlantic Water Gardens and Aquascape to name a few. I tested them all and was pretty disappointed. Most of the 20 watt “halogen equivalent” LED bulbs which typically took 3 or 4 watts gave off a very whitish-blue light that looked like solar lights. Ughhh – that would never pass muster with the wife!
This all changed when we took delivery of Aquascape’s first LED lights last year. We were blown away! The 3 Watt Bullet light was incredible.
When we put it side-by-side with our traditional 20 watt halogens by OASE, Aquascape and Atlantic Water Gardens, we could not tell the difference. They nailed it! These lights have 3500 kelvins (measure of the color temperature of light sources) which exactly matches up to soft yellowish light given off by the traditional Halogen lights. Not only that but when we put them side-by-side to our 50 watt halogens highlighting my palm trees in the front, we could not tell them apart.
The same thing happened when we put the 1 Watt Bullet Light and 1 Watt Waterfall Lights by Aquascape next to our 10 watt Cal Pump egg lights or other traditional 10 watt waterfall lights. We could not believe that we were getting the same light, same color hue and using only 10 per cent of the power!
Front of the House:
We used eleven 50 watt halogens in the front of our house to highlight the palm trees, etc and six 10 watt halogens inside our 2 tier fountain. This was 610 watts being consumed for 5 hours each night in front of our house alone.
To make a long story short we used 6 of the 1 Watt Waterfall Lights to replace the 6 Ten watt halogen Cal Pump Egg lights in our front fountain and eleven 3 watt Bullets to replace the eleven 50 watt Halogens in our front yard. Holy Cow! Some of our neighbors think the lighting looks even better now. Instead of 610 watts running for 5 hours each night, we are now running a whopping 39 watts.
The Good News
Last year when the Aquascape LED’s came out, they were silver and the lowest we could sell them was $103.99 for the 3 watt and $47.99 for the 1 watt Bullets. This year they have improved the lights to an “Architectural Bronze” finish and lowered the price to $79.98 for the 3 watt and $39.98 for both the 1 Watt Waterfall Light and the 1 watt Bullet Light.
The Better News
You get a discount for reading our blog! Use the Coupon Code: blog10 to get a 10% discount on these lights or anything else on our site.
Pond Products, Pond Tips | Comments Off on Pond Tips for Saving Energy: Lighting
The Pond Guys Blog
January 14th, 2010
admin
This is our new blog– a place to share information, experiences, and advice.
We look forward to exchanging ideas and problem solving with our loyal customers and Facebook fans!
Join our new Facebook page. facebook.com/ThePondOutlet
With this inital post, we are offering a 10% discount for anything on the Pond Outlet site. Use the Coupon Code: blog10.
Pond Products | 0 Comments