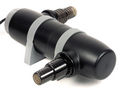

Cal Pump UV Clarifiers 9, 18, 36 watts
Starts at: $280.84
Brand: Cal Pump
SKU:XFRA129
MPN: 517425
Need accessories for this item?
View AccessoriesProduct Accessories

FRA129- 18 watt UV for ponds up to 2,000 gallons; 1000 gph, 3/4” to 1 1/2” barb fittings included.
FRA131 -36 watt UV for ponds up to 4,000 gallons; 2000 gph, 3/4” to 1-1/2” barb fltttings included.
Component List
- Transparent Screw Cap with power cord and ballast
- Quartz Glass Protective Sleeve
- UV Bulb
- Plastic Housing
- 2 Mounting Brackets
- Connectors for pump intake and discharge with gaskets
The UVC clarifier is not submersible and should be mounted in a dry location away from the pond edge. Make sure that children do not have access to the unit. Keep moisture away from the plug and socket.
- Insert the UVC bulb into the socket of the transparent screw cap.
- Insert the bulb assembly into the quartz sleeve.
- Next insert the complete quartz sleeve and bulb assembly into the plastic housing and screw the pieces together until secure.
- Place the gaskets inside the threaded end of each hose adapter. Hand-tighten all connections until secure.
- Attach the two support brackets to the plastic housing. Before switching on the UVC lamp, check that all connections are water tight by connecting the pump.
- Plug the UVC unit into the GFCI protected electrical unit to start operation. When the unit is working, a purple ultraviolet light can be seen through the transparent screw cap.
- Place the O-Ring on the quartz sleeve and slide it to the top of the sleeve.
- Insert an O-Ring in the groove on the top of the quartz sleeve.
- Insert the UVC bulb into the socket of the cap/cord assembly. It is important that you do not touch the UVC bulb. The small amount of oil that is naturally on your skin will ruin the bulb. If you touch the bulb, clean it with rubbing alcohol before resuming service.
- Insert the Water Guide into the inlet side of the plastic housing. Turn the Water Guide until it engages with the key in the plastic housing.
- Insert the quartz UV lamp into the plastic housing and screw the pieces together until secure.
- Attach the rubber seal to the inlet side of the plastic housing and then attach the discharge side of the housing. Screw the two pieces together until secure.
- Insert the gaskets inside the hose connectors and attach to the plastic housing.
- Attach the support brackets to the plastic housing.
Safety Instructions
Never submerge the unit in water! The external electrical cable of this
apparatus cannot be replaced. If the cable is damaged, the apparatus
must be destroyed. Remember that UVC radiation is dangerous to the eyes
and skin. Always switch off the unit if there is no water running
through it to prevent overheating. Do not look directly into unshielded
bulb as damage to the eyes may occur. Check the UVC lamp after the unit
is assembled through the transparent screw cap. The power supply must be
switched off immediately if the apparatus or the electrical cord should
become damaged. The US National Electrical Code and many local codes
require that a Ground Fault Circuit Interrupter (GFCI) be installed in a
branch circuit supplying fountain equipment rated above 15 volts AC.
Maintenance
In order to keep the UVC apparatus working properly, you must clean the
intake and discharge connections and the quartz sleeve 2 to 3 times a
year. To do this, you must first switch off the power supply to the UVC
apparatus and to the pump unit. Carefully remove the quartz sleeve from
the bulb and cap cord assembly. Wash the quartz sleeve with lukewarm
soapy water and rinse thoroughly. Remove any lime scale with vinegar and
rinse thoroughly (it is important that you do not touch the UV Light
Bulb; the small amount of oil that is naturally on your skin will ruin
the bulb. If you touch the bulb, clean it with rubbing alcohol before
resuming service). The effective service life of the UVC lamp is 6,000
burning hours. If used continuously, the UVC lamps will last the entire
pond season. It is recommended that you replace the UV bulb every
spring.
Additional Maintenance Tips
When carrying out any maintenance, the unit must be unplugged from the
electrical outlet. Always remove the intake and discharge hoses and
drain the water before cleaning. When algae densities are high in your
pond, the unit should be cleaned regularly every 3 to 5 days until the
problem is under control. When reassembling, make sure the O-rings are
properly seated on the quartz sleeve. A small amount of petroleum jelly
can be used for lubrication, if necessary. The UVC bulb should be
replaced every season to guarantee efficient operation. During the
winter season when temperatures fall below 50 degrees Fahrenheit, remove
the UVC apparatus to prevent it from freezing.
Applications
- The 9 Watt UVC unit is suitable to treat ponds up to 2,000 gallons. The maximum recommended flow rate for this unit is 500 gph.
- The 18 Watt UVC unit is suitable to treat ponds up to 4,000 gallons. The maximum recommended flow rate for this unit is 1,000 gph.
- The 36 Watt UVC unit is suitable to treat ponds up to 8,000 gallons. The maximum recommended flow rate for this unit is 2,000 gph.
Use
UVC equipment has been used for some time to keep aquarium and pond
water free of floating algae and to reduce water borne pathogens. UVC
filtration can also ensure crystal clear water and a healthy aquatic
environment for both fish and aquatic plants. The effect is based on the
use of ultraviolet radiation, which affects the cells of both plants
and animals. The effect is optimized by the fact that water to be
filtered is led directly along the UVC tube in a thin film. The UV
radiation will kill the algae but a pond filter is necessary to remove
the clumps of dead algae. UV clarifier will not kill string algae. How
efficiently a clarifier works depends entirely on the conditions of your
pond (i.e., the number of plants and fish, and the amount of sun
exposure). For most ponds with normal levels of green water, the
cleaning process can take anywhere from 1 to3 weeks. It is recommended
that you have the UVC unit on throughout the pond season. During the
winter season when temperatures fall below 50 degrees Fahrenheit
(December to mid March), the UVC unit should be removed to prevent it
from freezing.
Putting the UVC unit in use
In order to ensure that maintenance and cleaning of the UVC unit is kept
to a minimum, it is recommended to use a filter with your pond pump.
Always install the UVC apparatus outside the pond. Make sure that it
cannot become immersed in water (it is important that you do not touch
the UVC light bulb; the small amount of oil that is naturally on your
skin will ruin the bulb. If you touch the bulb, clean it with rubbing
alcohol before resuming service).